The Contacts plugin has a very useful functionality - tagging. This article will teach you in detail how to use the feature properly.
Note: Please keep in mind that the Contacts plugin tags feature is incorporated into the Contacts plugin itself and has nothing to do with the separate Tags plugin (this plugin is about issue tagging).
Feature description
This great feature allows you to tag your contacts which means you can browse them more efficiently and easily, making your job optimized.
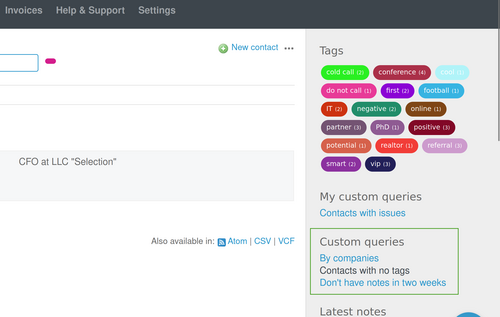
When you open your contacts' list, the already existing tags are visible in the list itself (connected to every contact/company) as well as on the ride sidebar (mixed tags - in the brackets you can see the total number of the tag appearing in the contacts/companies).

If you click on some of the tags, then it automatically filters the list of contacts with the ones that have this tag in it.

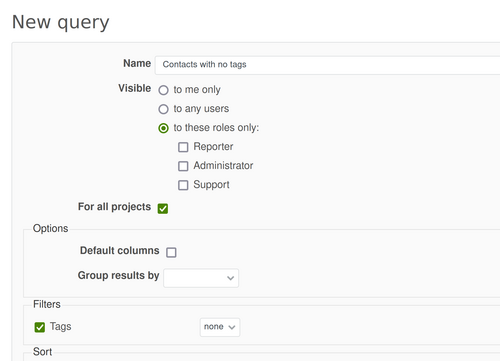
Also, you can select the Tags filter manually (from the available filters' list) and then you will have more options to choose:
- is
- is not
- none
- any
For example, if you choose the None option, then all the contacts that are still not tagged will appear in your list.

Afterward, you may save your query if you wish, so there is no need to every time set the filter.

The saved query could be accessed in the right sidebar.

Create/add tags
To add a tag, please open an existing contact (company) or create a new contact or company and into the Tags field start typing the tag you are looking for and just select it from the drop-down menu that appears with suggested tags.

And to create a new tag it is easy too. Just type the name of the new tag that you need and click on it below.

As a result both tags (existing and new) are successfully appearing when the contact (company) is saved.

Edit/delete tags
In case you would like to edit or delete the already existing contact (company) tags, then you have to go to Administration - Contacts - Tags tab. Then just use the Edit or Delete buttons in order to apply the needed action.
